
Twitch is the world’s leading live-streaming platform for gamers, creatives, and IRL broadcasters. Millions of people tune in each day to watch live gameplay, music, chat shows and more. If you’ve ever wondered how to stream on Twitch, now is a great time to jump in. In this guide, I’ll walk you through what Twitch is, why it’s worth streaming there, and all the steps you need – from equipment and software to setting up your channel and promoting yourself. Think of this as your personal checklist (I remember when I started, a roadmap like this would’ve been a lifesaver!). So let’s dive in and get you streaming.
Table of Contents :
What is Twitch and Why Stream on It?
What You Need to Stream on Twitch (Hardware & Software)
Creating and Setting Up Your Twitch Account
Setting Up Streaming Software (OBS, Streamlabs, etc.)
Customizing Your Twitch Channel
Tips for First-Time Streamers
Common Mistakes to Avoid
How to Live Stream to Twitch from a Desktop
How to Live Stream to Twitch from a Gaming Console
How to Stream on Twitch on Mobile
What Content to Stream on Twitch?
How to Grow Your Twitch Audience Organically
Twitch Streaming FAQs
What is Twitch and Why Stream on It?
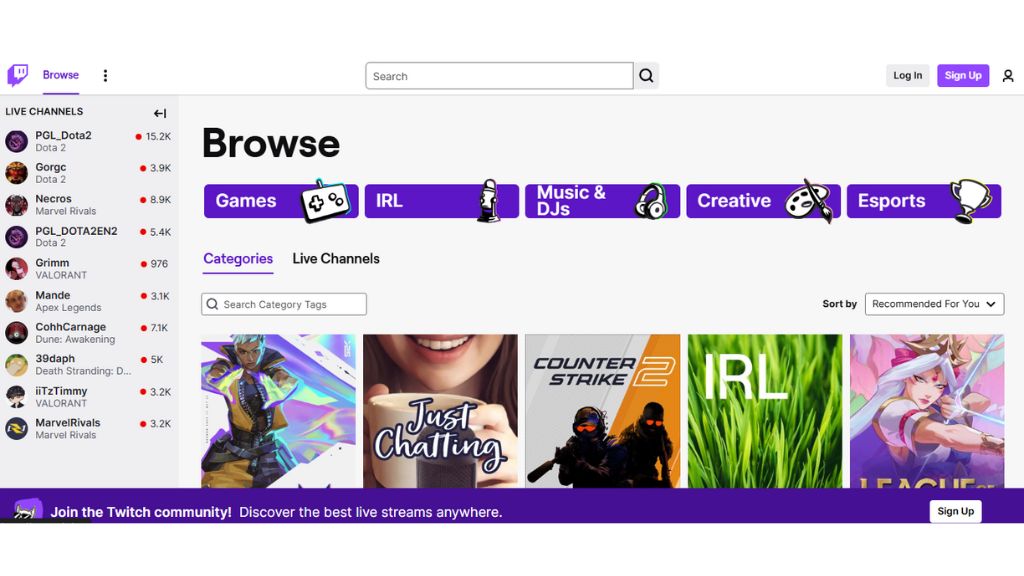
Twitch is an Amazon-owned live video streaming service focused mainly on gaming, esports, creative arts, music and “IRL” (real life) content. Launched in 2011, it quickly became the go-to site for live streams. Today, Twitch ranks among the top 30 websites worldwide, attracting 15 million daily active users. In simple terms, if you want an audience for your gaming sessions, creative projects or just chatting live, Twitch is where people are already hanging out.
Why stream on Twitch? For starters, the built-in audience is huge. As one guide notes, Twitch has “millions of daily viewers” and “thousands of streams running at once”. This means people are always online, looking for something fun or interesting to watch. Streaming on Twitch lets you build a community of fans who share your passions. Viewers can interact with you through live chat, using emotes, and even sending donations or “Bits” (Twitch’s cheering currency). Over time, many streamers grow a loyal fanbase, earn money through subscriptions and ads, and sometimes even turn streaming into a career.
Another big reason is Twitch’s features: it supports live chatting, on-screen alerts for follows/subscriptions, custom emotes, and more. Plus, Twitch offers clear pathways to monetize your hobby (affiliate or partner programs, bits, ads) once you meet certain milestones. Basically, if you’re creative and love engaging with people, streaming on Twitch is a unique way to have fun and possibly earn some income while doing it. It can be daunting at first, but with the right setup and some confidence, anyone can start broadcasting. So let’s talk about what you actually need to get going.
What You Need to Stream on Twitch (Hardware & Software)
Streaming on Twitch doesn’t require Hollywood-level gear – just a few key items. At minimum, you need a device to stream from, a solid internet connection, and streaming software. For most people, the streaming device is a computer (PC or Mac) that can handle both running the game/app and encoding video. Twitch recommends at least an Intel Core i5-4670 processor (or equivalent AMD Ryzen 5 1600) and 8GB of RAM as a baseline for streaming. In practice, a somewhat more powerful CPU and 16GB of RAM are better if you want smooth high-quality streams. If you’re streaming graphically intensive games, also make sure your video card can handle it or consider a dual-PC setup.
You’ll also need a reliable internet upload speed. Aim for at least 3–6 Mbps upload for 720p streaming, and 6–10+ Mbps for 1080p. If possible, use an ethernet cable for stability rather than Wi-Fi. Other hardware includes:
- Microphone: Clear audio is a must. Even a basic USB mic (like a Blue Yeti or a HyperX SoloCast) is a huge upgrade over a laptop mic. In fact, Business Insider points out that “most streamers have at least a microphone” during setup. You don’t technically need a mic to go live, but having one means you can talk to your viewers. It really makes streams more personal (I remember fumbling with my first cheap headset mic – but trust me, even a small improvement makes you sound professional).
- Webcam (optional): Most streamers use a webcam so viewers can see them. It isn’t mandatory (many esports streamers do “just chatting” without facecam), but it helps viewers feel connected when they can see your reactions. A simple 720p webcam (or your phone camera via an app) works fine. Place it so your face is well-lit. (Tip: using a ring light or facing a window gives better image quality.)
- Camera/Console Capture: If you stream from a console (like PS5, Xbox) or a DSLR camera, you’ll need a video capture card (Elgato, AVerMedia etc.) to bring that video into your PC. But many modern consoles can directly stream via their built-in Twitch app, so PC-less streaming is possible too.
- Green Screen / Lighting (optional): Not necessary for a first stream, but many streamers add a green screen or good lighting later for a clean look.
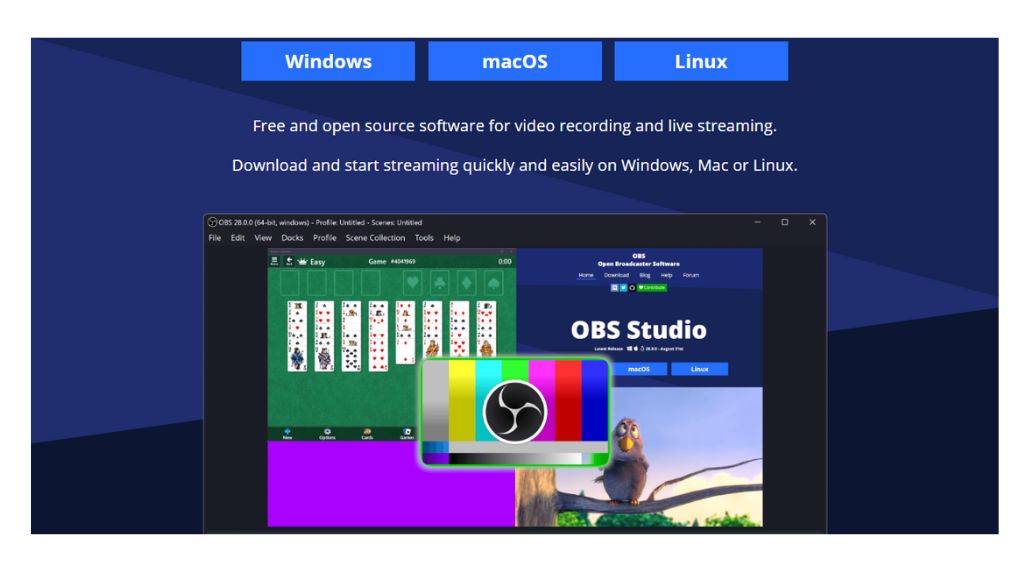
- Streaming Software: You need a broadcasting app to capture your game and webcam and send it to Twitch. Popular options are OBS Studio (free, open-source), Streamlabs Desktop (user-friendly, free with optional paid upgrades), XSplit Broadcaster (paid, easier for beginners), or Twitch Studio (Twitch’s own free app for newbies). For example, Business Insider notes the easiest route for beginners is Twitch Studio, which “is specifically designed for streaming beginners”. Essentially you just download one of these apps to your computer.
Each of these pieces fits together. A decent PC or laptop handles gaming and encoding, your mic and camera capture audio/video of you, and streaming software mixes it all into a “scene.” Once you have these basics, you’re ready to create your Twitch account and start configuring everything in the next sections.
Creating and Setting Up Your Twitch Account
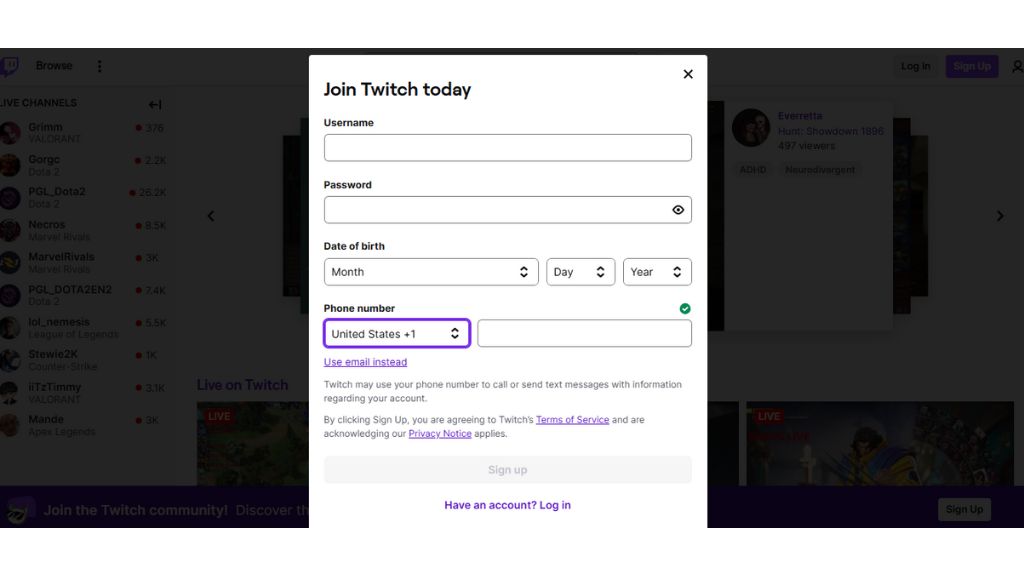
First things first: go to Twitch.tv and sign up for an account. Pick a memorable username (your brand), enter your email and birthdate, and verify your email address. Easy! Once you’re logged in, click the profile icon, go to Settings, and fill in basic info: write a short bio, add social media links, and upload your profile picture (more on that in a sec).
One quick security note – enable Two-Factor Authentication (2FA) right away. By default, Twitch accounts start without its. In your Account Settings under Security & Privacy, set up 2FA (usually via an authenticator app or SMS). It sounds like a pain, but it really protects your channel from hijacking.
Next, you’ll want to grab your Stream Key. This is a secret code that lets your streaming software broadcast to your channel. In Twitch, go to Creator Dashboard (click your profile, then Creator Dashboard), then click Preferences → Channel. Scroll to Primary Stream key and click Copy. Do NOT share this key with anyone (it’s like the password for your stream). You’ll paste this into your streaming software in a moment.
With your account created, maybe take a minute to experiment on Twitch.com: explore categories (games, music, creative), follow a few streamers you like, watch chat flows. It’s a good way to see Twitch culture. But now, let’s set up the actual software you’ll use to go live.
Setting Up Streaming Software (OBS, Streamlabs, etc.)
Whether you choose OBS Studio, Streamlabs, XSplit, or Twitch Studio, the setup flow is similar. I’ll describe the basic steps (using OBS as an example, since it’s free and powerful) and sprinkle in how it works on others.
- Download and Install: Get the latest version of your chosen software. For OBS, go to obsproject.com. For Streamlabs Desktop, use streamlabs.com (you might need a Twitch login). Twitch Studio you can download directly from Twitch. Installation takes a couple of minutes.
- Connect to Twitch: Open the app. In OBS, go to Settings → Stream. Select “Twitch” as the service, and either click “Log In” (if available) or paste your Stream Key from earlier into the box. Streamlabs OBS will often ask you to authenticate with Twitch directly. Twitch Studio will prompt you to log in and authorize it to access your Twitch account. This connects the software to your channel, so whatever you broadcast goes live on Twitch.
- Create Scenes and Sources: Think of a Scene as a layout of what your viewers see. A common approach is to make one scene for your main game and another for just chat or “BRB” breaks. In OBS, click the + under Scenes to add one. Then under Sources (with that scene selected), click + to add sources:
- Game Capture / Window Capture / Display Capture – picks up the game or app you want to stream.
- Video Capture Device – adds your webcam feed.
- Audio Input Capture – selects your microphone.
- Audio Output Capture – captures your game/system sound (often added by default).
- Image – you might add static images (like a logo or intermission screen).
- Text (GDI+) – to display text like “Twitch: yourchannelname”.
4. Arrange these sources so they fill the canvas as desired (e.g. game full-screen, webcam in a corner). You can resize and layer them by dragging. In OBS you can even crop sources or add filters (right-click a source).
5. Overlays and Alerts: For a polished look, many streamers add an overlay graphic (frame around webcam, logos) and alert widgets (fancy pop-ups when someone follows or subscribes). Streamlabs and Twitch Studio have built-in alert setup (usually a guided one-click). If using OBS, you can incorporate free alert widgets from sites like Stream Elements or Own3D. At first, though, you can stream without custom alerts.
6. Set Output Quality: In the settings, pick your stream quality. OBS has an Auto-configuration wizard, or you can manually set Video bitrate (e.g. 3000–6000 kbps for 720p/1080p) and resolution (1920×1080 or 1280×720). Business Insider notes Twitch Studio can auto-test your hardware/internet to pick quality. In OBS under Settings → Video, choose a canvas and output resolution (720p is fine to start), and framerate (30 or 60). Under Settings → Output, set your encoder (software x264 or a hardware option like NVENC if available) and bitrate. Too high a bitrate without enough upload speed will cause buffering for viewers, so start moderate.
7. Test Your Setup: Before going live, do a local recording or test stream (Twitch has a “Stream Key” for Private or use a channel like a friend’s test channel) to make sure audio levels are right. Speak into the mic and check the mixer levels. In OBS you can preview. Tools like Streamlabs have a “Mic Check” utility. Trust me, spend at least 10-15 minutes ensuring everything looks and sounds good. As StreamScheme advises: “Spend time familiarizing yourself with [your software] before you ever start streaming”.
8. Go Live: When ready, hit Start Streaming in OBS (or Go Live in Streamlabs/Twitch Studio). In Twitch Studio, you’ll see a “Ready to Go Live” screen to enter your title and category. In OBS/Streamlabs you can either title your stream on Twitch’s Dashboard or use the software if it has that feature. (Streamlabs OBS and Twitch Studio support editing title/category from within the app.) Finally, confirm your stream info and click Go Live. Congrats – you’re on the air!
As XSplit’s official guide summarizes: “Add your game source, audio devices and webcam in just a few seconds. Select your resolution and frame rate, then click the Stream button – your first quality stream is now live on Twitch!”. It really can be that straightforward once you have everything set up.
Customizing Your Twitch Channel
Now that your account exists and software is ready, let’s make your Twitch channel page look good and informative. Think of your channel page as your storefront. When viewers click your profile, what do they see? Here are key customization steps:
- Profile Picture: Upload a clear profile image. StreamScheme advises using a personal photo rather than a logo, especially for new streamers. A friendly face lets people connect with you. Use a bright, smiling photo so it stands out in chat and follower lists.
- Banner / Cover Image: Twitch lets you set a banner (header) graphic. Make something fun or professional (there are free templates online). This is a great place to convey your style or display your social media handles.
- About Panels: Below your video player on Twitch are panels – these are like profile sections with images and text. Use them to share your About Me blurb, schedule, social links (Discord, Twitter, Instagram, YouTube), donation links, and stream rules. For example, create small panel images that match your branding (24×600 px usually) and explain your bio, your regular streaming times, and how viewers can support you. (Pro tip: Twitch’s official articles and many guides explain how to add panels.)
- Offline Screen or Trailer: When you’re offline, visitors see a static image or screen by default. You can customize the offline image in your channel settings (stream scheme suggests making a custom one). Additionally, Twitch allows a Channel Trailer – a short video that auto-plays for new visitors when you’re offline. Use it to showcase highlights or introduce yourself. As StreamScheme notes, create “a Twitch channel trailer to showcase your best features… entices them to follow”. This way, even when you’re not live, potential followers see why they should come back.
- Extensions (optional): Twitch offers interactive extensions (like polls, games, or overlays). Some streamers use these to engage audience. You can add extensions via your Creator Dashboard under the Extensions tab. These aren’t required, but things like a music player or point leader board can add flair.
- Chatbot and Alerts: We briefly mentioned alerts for subs and follows (which are usually set up in your streaming software or via services like Streamlabs). Also consider adding a chat moderator bot (like Nightbot or StreamElements bot). StreamScheme emphasizes “Don’t mistake these [chatbots] for view bots… they are a mod tool, not for cheating”. A bot can filter spam, respond to basic commands, and display notifications in chat for you.
Once your visuals and profile info are set, people visiting your channel will know what you’re about. They should immediately see your name, schedule, and what games/content you do. And remember, all this preparation makes your stream feel polished and professional from Day 1.
Tips for First-Time Streamers
Ready to hit “Go Live”? Before you do, here are some friendly tips I wish someone had told me when I started:
- Have a Plan: Even an outline. Know what game or topic you’ll cover, and maybe a goal for the stream (like finish a level, or chat with followers). This keeps you on track and prevents awkward silence. It’s okay if you ramble sometimes – just keep engaged.
- Consistency is Key: If you can, pick a regular schedule (e.g. weeknights 7–9pm). Viewers are more likely to return if they know when you’ll be on. Advertise your schedule on your channel panels and social media. Pretzel’s blog advises streaming “regularly and consistently… announcing when your next stream will be”. Even if only a small audience at first, consistency shows professionalism and helps growth.
- Engage with Chat: Talk to whoever shows up, even if it’s just one viewer. Thank them for joining, ask questions, and respond to chat messages by name. It can feel weird if no one chats, but remind yourself that some may lurk silently – greet them too! Building a community is about conversation, not monologue.
- Test Audio and Lighting: Make sure your viewers can actually see and hear you clearly. I remember early streams where my mic was too quiet and I lost viewers. Do a sound check (Streamlabs has a tool) to set mic volumes. And face a light source (window or lamp) so your camera feed isn’t dark.
- Keep Overlays Simple: When starting, don’t clutter your screen with a dozen graphics. Focus on the game and chat. You can always add fancy alerts and overlays later after you know what your audience likes. As one blogger put it, “the video and audio sources should be tested ahead of time but should remain fairly the same”.
- Stay Positive and Authentic: Your genuine passion is what viewers connect with. Share stories, jokes, frustrations – just be you. Fourthwall’s guide stresses authenticity: “Viewers can tell when you’re not being genuine, so it’s crucial to be yourself”. If you’re having fun, others will feel that vibe too.
- Moderate Your Chat: If you get more viewers, consider adding moderators or using a chatbot for basic filtering. Keep your chat friendly by enforcing simple rules (no hate speech, spam, etc.). It keeps the community welcoming.
- Learn as You Go: Don’t expect perfection from your first stream. Viewership might start at zero or one – it’s normal. Use each stream as a learning experience: watch the VOD afterwards if you can, note improvements (better camera angle, different tone, etc.). Even big streamers started small.
By following these tips, your first few streams will be smoother and more enjoyable. Remember, everyone starts somewhere – even the top Twitch stars were noobs once! Keep at it, and each stream will feel more natural.
Common Mistakes to Avoid
Even experienced streamers slip up, so let’s cover some pitfalls to sidestep:
- Skipping Tests: Going live without testing can be embarrassing. Double-check audio levels, scene transitions, and internet stability before you start. A 5-minute private test stream or recording is worth it.
- Ignoring Copyright: Never play copyrighted music or video without permission. Twitch can mute your stream or ban clips if it detects unlicensed music. (Use Twitch’s music library, stream-safe tracks, or a service like Pretzel for licensed music.)
- Using View Bots or Buying Followers: This is a huge no-no. Twitch’s rules strictly ban viewbots/fake viewers. As StreamScheme warns: “Don’t mistake [chatbots] for view bots… using [view bots] is a bannable offense”. Growing organically takes time, but cheating can get your channel banned.
- Being Inconsistent: Irregular streams make it hard for viewers to follow you. Try to stick to the schedule you set (and if you must cancel, announce it early on social media).
- Not Engaging Your Audience: The silence of ignoring your one chat participant can drive them away. Speak up! Even say things like, “Welcome to the stream!” or share a quick reaction. If chat is quiet, narrate what you’re doing or thinking.
- Poor Stream Title/Category: Always set a clear stream title and the correct game or category. Titles tell viewers what’s happening (e.g. “First Time Playing This New Game!”). Wrong category means the wrong audience will find you (e.g. don’t label a cooking stream as a game!).
- Skipping Branding: If you change your channel name or visuals too often, people won’t recognize you. Pick one brand style (name, logo, colors) and stick with it. It’s easier for your audience to remember you.
- One-Sided Streaming: If you ever raid or host other streamers, don’t just push your content. Engage with their chat and community. Twitch is about community-building, not cross-promotion spam.
Avoiding these missteps will save you a lot of headaches. If you stay authentic and follow Twitch’s guidelines, you’ll have a far more positive experience as a new streamer.
How to Live Stream to Twitch from a Desktop
Starting with a desktop is actually the most popular way to stream on Twitch. Here’s a super simple breakdown:
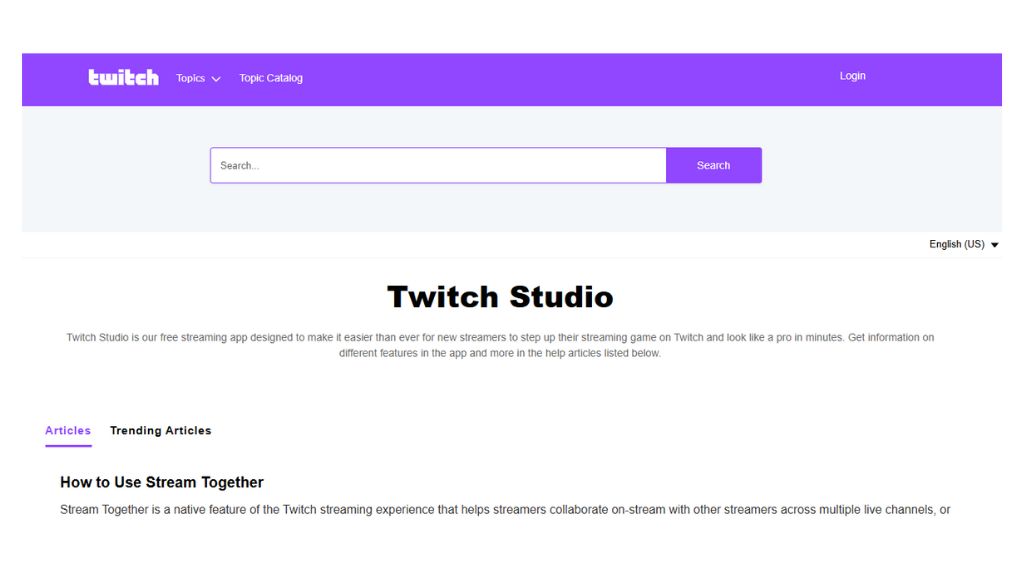
1. Download Twitch Studio
Twitch Studio is Twitch’s own beginner-friendly streaming app. You can also use OBS Studio or Streamlabs if you want more control. I started with Twitch Studio because, honestly, I couldn’t figure out OBS at first.
2. Login to Twitch and Connect Your Mic and Camera
Go to Twitch.tv and log in. In Twitch Studio, the app will guide you to set up your microphone and camera. It’s pretty easy — but remember to check your audio. Nobody likes the silent streamer!
3. Customize Your Stream
Here’s where you can:
- Set up overlays (that’s the cool stuff you see around the screen)
- Add alerts for new followers or donations
- Personalize your chat window and stream background
I think adding overlays really helps your stream stand out, and yeah, it’s fun to play around with them too.
4. Start Streaming
Once you’ve got everything set up, click “Start Stream” at the bottom of Twitch Studio.
- Pick your stream category (like Fortnite, Just Chatting, or IRL)
- Write a catchy stream title (seriously, don’t write something like “Test Stream”)
- Click Go Live
Boom! You’re now officially live on Twitch. Trust me, it’s both nerve-wracking and thrilling.
How to Live Stream to Twitch from a Gaming Console
If you’re a console gamer, streaming is surprisingly simple. Here’s how to do it on PS4/PS5 and Xbox:
For PlayStation 4 or 5:
- Open the game you want to stream.
- Press the Share button (PS4) or Create button (PS5).
- Select Broadcast Gameplay.
- Choose Twitch and log in to your account.
- Adjust your stream title and settings.
- Hit Start Broadcasting.
For Xbox One or Series X/S:
- Download the Twitch App from the Microsoft Store.
- Log in using your Twitch account.
- Select Broadcast from the app.
- Configure your stream title, category, and webcam (if connected).
- Click Start Streaming.
It seems easy, but remember, console streaming has limited customization compared to PC streaming.
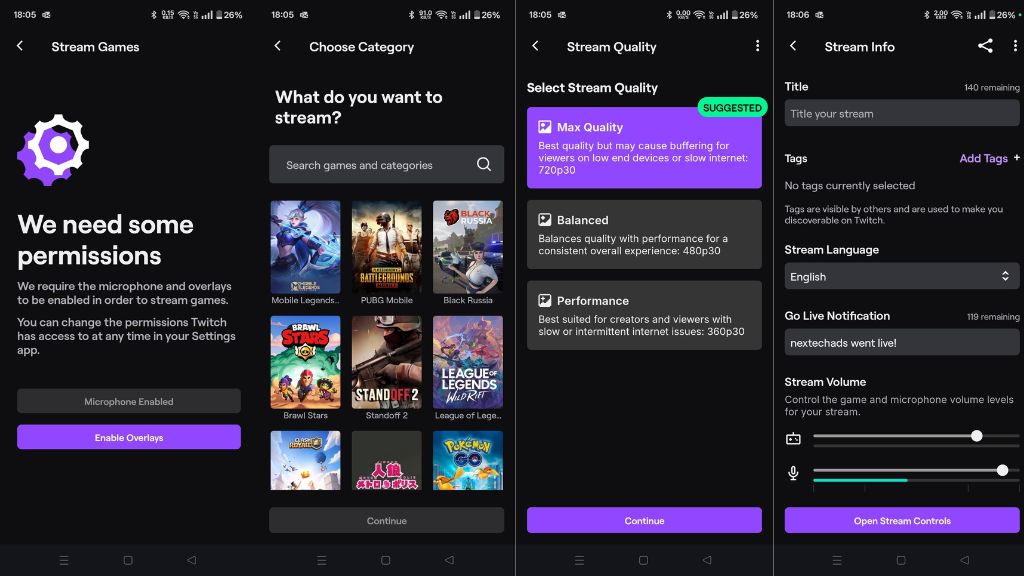
How to Stream on Twitch on Mobile
Did you know you can stream on Twitch directly from your phone? It’s surprisingly easy, although more limited than PC streaming. Here’s the quick rundown:
- Download the Twitch app: Get it from the iOS App Store or Google Play and log into your Twitch account.
- Tap the camera icon: On the home screen of the app, hit the little camera icon at the top (it might be next to the search bar).
- Choose Stream Type: You’ll see options like “Stream Game” (to share your screen/game on phone) or “Stream IRL” (to broadcast via your phone’s camera). Select what you want.
- Adjust settings: You can set a stream title and maybe a few basic options (like camera selection).
- Go Live: Just tap “Start Stream” and you’re broadcasting. You’ll have a simple interface with your camera preview and chat.
Business Insider summed it up: “The Twitch mobile app has streaming built into it, so you just have to tap an icon”. The quality won’t be as high as on PC, and you won’t have fancy overlays, but it’s a fun way to go live on-the-go. Great for IRL chats, game streaming on mobile, or quick updates to your fans when you’re not at your desk. Just remember to have good lighting and a steady internet connection (Wi-Fi or strong LTE).

What Content to Stream on Twitch?
Okay, so what should you actually stream? Here are some content ideas that really work on Twitch:
- Gaming: The obvious one. Popular games like Fortnite, Call of Duty, Minecraft, or even niche indie games.
- Music: Live performances, music production sessions.
- Just Chatting: Super popular. You can literally talk to your audience about your day, random thoughts, or trending topics.
- Cooking: Live cook-alongs are fun, and people love the behind-the-scenes kitchen vibe.
- Fitness: Workout streams have their own loyal community.
- Creative Arts: Painting, digital art, crafting — people love watching creative processes.
I think it’s best to pick something you’re genuinely passionate about. Your excitement will naturally pull viewers in.
How to Grow Your Twitch Audience Organically
You’ve set up everything – now comes the challenging part: building your audience from zero. The key is consistency, community, and content. Here are proven strategies:
- Create a Memorable Brand: Pick a catchy channel name and stick with it. Use consistent imagery (colors, logo, style). Fourthwall emphasizes a strong personal brand and authenticity: “Creating a personal brand on Twitch is crucial… choose a catchy username and unique personality… be yourself”. People are drawn to unique personalities or themes, so lean into what makes you different.
- Provide Quality Content: High-quality audio/video and a clear theme keep viewers returning. If you’re excellent at a particular game, or do entertaining creative streams, make that your focus.
- Promote on Other Platforms: Leverage YouTube, Twitter, TikTok, Instagram, etc. For example, Pretzel’s blog advises turning your stream highlights into YouTube videos: “After each of your live sessions, watch your stream and pick the best moments… upload them to YouTube so your content is now forever on the internet for new fans to discover”. Short clips on TikTok or Instagram Reels can also go viral and lead viewers back to your Twitch.
- Engage on Twitch Itself: Twitch recommends being active on the platform. Watch and chat on other streamers’ channels (naturally, don’t spam links). Support others by following, hosting, and raiding them. Pretzel points out that one of the best organic growth tactics is to “be active on other channels and streams… support your fellow streamers and get your name out there”. When you raid someone (sending your viewers to another channel at the end of your stream), often those streamers will return the favor someday.
- Consistency and Scheduling: As mentioned earlier, stick to a regular streaming schedule. Use Discord or a newsletter to remind followers of upcoming streams. Pretzel highlights, “Humans are creatures of habit… Stream regularly and consistently”. Over time, viewers will start to include your stream in their routine.
- Engage Your Community: Build a Discord server for fans to chat between streams. Have chat games, giveaways, or viewer games during streams. Make your viewers feel heard and appreciated – many streamers grow simply by making a tight-knit community where followers feel at home.
- Be Patient and Adapt: Growth takes time. Focus on improving bit by bit – maybe by analyzing your VODs or asking your regulars what they enjoy. Try new game genres or stream times and see what sticks.
By combining these strategies, you’ll gradually see more viewers. Every big streamer started with small numbers; as Fourthwall says, “building a following doesn’t have to be complicated”
Before you press Go Live, run through this checklist to avoid hiccups:
- Check Your Connection: Make sure your internet is up and any game patches or downloads are done.
- Test Audio/Video: Do a quick mic test. Are game sounds and mic balanced? Is the camera framed and lit?
- Set Up Your Scenes: Verify your scenes in OBS/Streamlabs. Confirm the correct game/app is captured. Set the correct scene for Starting Soon, Live, BRB, etc.
- Graphics/Alerts Ready: If you’re using alerts, make sure the notifications work. A quick test alert is a good idea (both OBS and Streamlabs have test buttons).
- Title, Category, Tags: In Twitch’s Dashboard or your streaming software, update the stream title, game/category, and tags (language, game title, etc.). This helps viewers find you.
- Moderators and Chatbot: If you have mods, check they’re in chat and ready. Ensure your chatbot is active with commands (e.g. !social to display your socials).
- Water, Snacks, Breaks: Have a drink ready. Plan to take quick breaks if it’s a long session (use a BRB scene).
- Positive Mindset: Take a deep breath. Remember why you started streaming – have fun! Even if only one person shows up, give it your best.
Once everything’s set, click Start Streaming in your software and let the adventure begin. Welcome to broadcasting on Twitch!
In conclusion, streaming on Twitch is an exciting way to share your interests with the world. You now know what Twitch is, what gear and software you need, how to set up an account and go live, plus tips on customization, growing your audience, and monetization. It might feel overwhelming at first, but take it step by step. As you grow, consider ways to promote your channel. For instance, companies like NexTech Ads specialize in Twitch promotion services to help streamers reach more viewers through targeted ads and marketing. Good luck with your streams, and enjoy the journey of building your Twitch community!
Twitch Streaming FAQs
1. Do I need a powerful PC to stream on Twitch?
Not necessarily. Twitch Studio and basic streaming don’t need a high-end rig, but for smoother streams, a solid GPU and CPU definitely help.
2. Can I stream from my phone?
Yes! Twitch’s mobile app lets you stream IRL content directly from your phone.
3. How do I grow my Twitch channel?
Consistency is key. Also, use Twitch promotion services like those offered by Nextech Ads to reach a bigger audience. Trust me, getting that first loyal viewer feels amazing.
4. Can I stream copyrighted content?
Nope, you’ll get hit with DMCA takedowns. Stick to royalty-free music or Twitch-approved soundtracks.
5. Can I multi-stream to Twitch and YouTube?
Twitch’s Affiliate Agreement doesn’t allow simultaneous live streams on other platforms.